

CyberPanel is a powerful web hosting control panel that streamlines server management by harnessing the speed and efficiency of OpenLiteSpeed — a lightweight, high-performance web server. If you’re seeking a user-friendly solution to manage websites, databases, and email services on your Ubuntu 20.04 server, CyberPanel is a top choice. Here’s how to install CyberPanel easily.
In this guide, we’ll walk you through the step-by-step installation of CyberPanel with OpenLiteSpeed on Ubuntu 20.04. CyberPanel can also be installed on CentOS, Alma, and Rocky servers. But in this post, we are going to use Ubuntu 20.04. This process can also work with Ubuntu 22.04, so read on.
Prerequisites
Before we begin, let’s discuss the requirements needed:
- A fresh installation of Ubuntu 20.04
- Root or sudo privileges
- At least 2GB RAM and 10GB disk space
- A Domain name
Once these are available, the next step is to connect your domain to your Ubuntu server. To connect, we have to log in to the domain name provider, and I will be using Namecheap in this tutorial. Click on the domain you want to use, then click manage, and a dashboard like the image below will display.
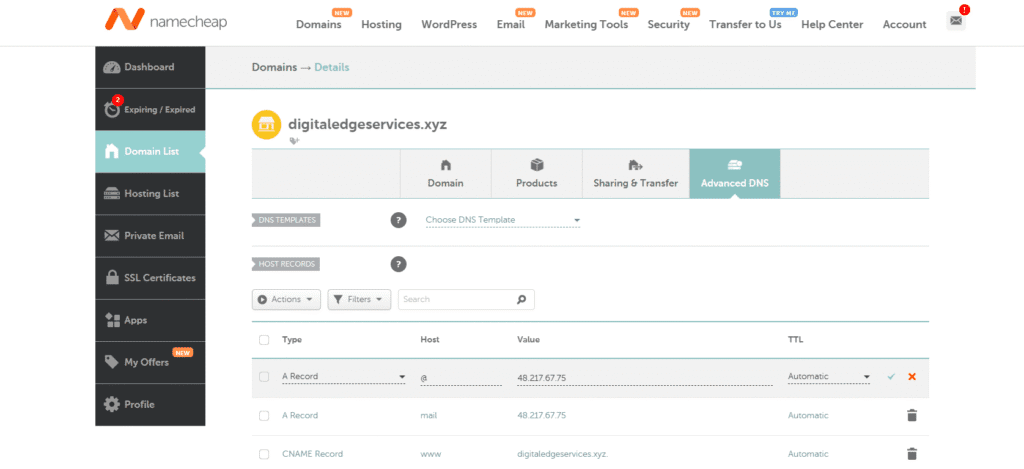
Add an ‘A’ record as shown in the image. Use ‘@’ if you’re pointing to your primary domain, or create a subdomain such as ‘server.domain.com.’ In this case, enter ‘server’ under the HOST field and the IP address of your Ubuntu server under VALUE. For detailed guidance, refer to our blog post: ‘How to Set Up and Manage DNS.’
Now, let’s proceed with installing CyberPanel — the process involves four main steps.
How to Install Cyberpanel in Five Steps
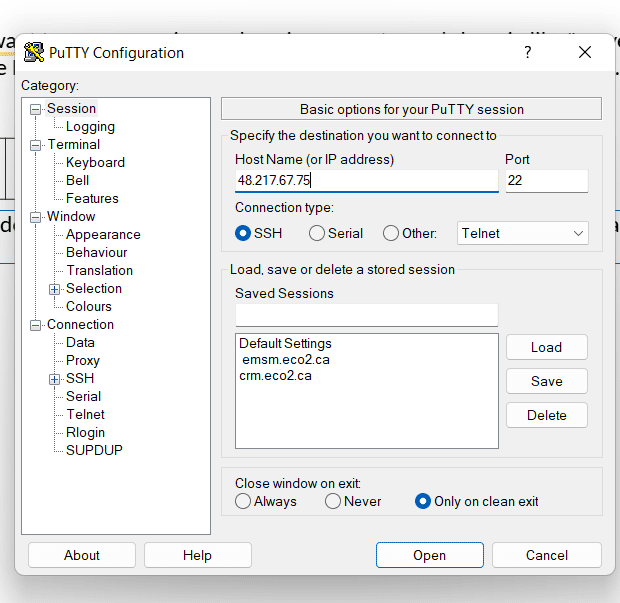
Step #1: Connect to your server
The first step is connecting to your server using an SSH client called PuTTY. Start by downloading PuTTY, then run it as an administrator. Once launched, paste your server’s IP address into the Host Name field and log in using your server credentials
Step #2: Update and upgrade Server packages
Run this command to update& upgrade your server packages
apt update -y && sudo apt upgrade -y
#if you don't have root access
sudo apt update -y && sudo apt upgrade
Step #3: Run the installation script
Execute the command below to start the automated installation script. You’ll be guided through a few prompts to select your preferred LiteSpeed version and any add-ons you’d like to include.
sh <(curl https://cyberpanel.net/install.sh || wget -O - https://cyberpanel.net/install.sh)In case you don’t have access to the root user, use this command
sudo su - -c "sh <(curl https://cyberpanel.net/install.sh || wget -O - https://cyberpanel.net/install.sh)"Step #4: Select the version of LiteSpeed that you would like to use
After running the command above, you’ll be prompted to select a CyberPanel version to install. We’ll choose OpenLiteSpeed, the free and open-source option.
 CyberPanel Installer v2.1.1

RAM check : 223/1682MB (13.26%)

Disk check : 4/30GB (18%) (Minimal 10GB free space)

1. Install CyberPanel with OpenLiteSpeed.

2. Install Cyberpanel with LiteSpeed Enterprise.

3. Exit.


  Please enter the number[1-3]: 1
Step #5: Select options and add-ons
Time to select the extensions you’d like to install in your CyberPanel. To do these, you have to answer all these questions.
Install Full service for CyberPanel? This will include PowerDNS, Postfix and Pure-FTPd.

Full installation [Y/n]: Y
Next question
Do you want to setup Remote MySQL? (This will skip installation of local MySQL)

(Default = No) Remote MySQL [y/N]: N
The next question is to select the version of OpenLiteSpeed you would like to install. I recommend you press Enter to select the latest version available.
Press Enter key to continue with latest version or Enter specific version such as: 1.9.4 , 2.0.1 , 2.0.2 ...etcSet admin password if you want or click enter, and Cyberpanel will create one for you. To set for yourself, choose “s”
Please choose to use default admin password 1234567, randomly generate one (recommended) or specify the admin password?
Choose [d]fault, [r]andom or [s]et password: [d/r/s] s
Please enter your password: YourStrongPassword
Password: Confirm Password: YourStrongPassword
Choose the add-ons you want, just use “Y” for all the questions
Do you wish to install Memcached process and its PHP extension?
Please select [Y/n]: Y

Do you wish to install Redis process and its PHP extension?
Please select [Y/n]:Y

Would you like to set up a WatchDog (beta) for Web service and Database service ?
The watchdog script will be automatically started up after installation and server reboot
If you want to kill the watchdog , run watchdog kill
Please type Yes or no (with capital Y, default Yes): Y
The installation will begin, and once the installation is complete, you will see your login information
###################################################################
                CyberPanel Successfully Installed

                Current Disk usage : 8/29GB (31%)

                Current RAM  usage : 325/3931MB (8.27%)

                Installation time  : 0 hrs 49 min 0 sec

                Visit: https://YourServerIpAdress:8090
                Panel username: admin
                Panel password: *****
---------------------------------------------------------------------------------
                Visit: https://server.domain.com:8090
                WebAdmin console username: admin
                WebAdmin console password: qYqJCl7pq58Uh
---------------------------------------------------------------------------------
                Visit: https://YourServerIpAdress:8090/rainloop/?admin
                Rainloop Admin username: admin
                Rainloop Admin password: KviPafcVSCl
---------------------------------------------------------------------------------
             Run cyberpanel help to get FAQ info
             Run cyberpanel upgrade to upgrade it to latest version.
             Run cyberpanel utility to access some handy tools .

              Website : https://www.cyberpanel.net
              Forums  : https://forums.cyberpanel.net
              Wikipage: https://docs.cyberpanel.net
              Docs    : https://cyberpanel.net/docs/

            Enjoy your accelerated Internet by
                CyberPanel & OpenLiteSpeed
###################################################################
If your provider has a network-level firewall
Please make sure you have opened following port for both in/out:
TCP: 8090 for CyberPanel
TCP: 80, TCP: 443 and UDP: 443 for webserver
TCP: 21 and TCP: 40110-40210 for FTP
TCP: 25, TCP: 587, TCP: 465, TCP: 110, TCP: 143 and TCP: 993 for mail service
TCP: 53 and UDP: 53 for DNS service
Would you like to restart your server now? [y/N]: y
CyberPanel has been successfully installed on your Ubuntu server. To test the installation, copy your subdomain or IP address into your browser’s address bar. Based on the example above, it should look something like this:
https://server.domain.com:8090
or
https://48.217.67.75:8090
If the installation was successful, you should see a screen similar to the one below. If you encounter an error such as ‘Website cannot be reached’ or connection issues, check your firewall settings and ensure all recommended ports are open. For a step-by-step guide on installing WordPress and setting up SMTP on CyberPanel, watch the video below.